Kubernetes KubeVirt
Kubernetes is designed to run containerized workloads, but many real-world systems still rely on virtual machines (VMs).
KubeVirt extends Kubernetes by allowing you to run and manage Virtual Machines alongside containers using the same Kubernetes API.
Table of Contents
What Is KubeVirt?
Kubevirt essentially brings virtualization into Kubernetes.
- Running Virtual Machines (VMs) inside a Kubernetes cluster
- Managing VMs using kubectl and Kubernetes resources
- Combining VM-based and container-based workloads in one platform
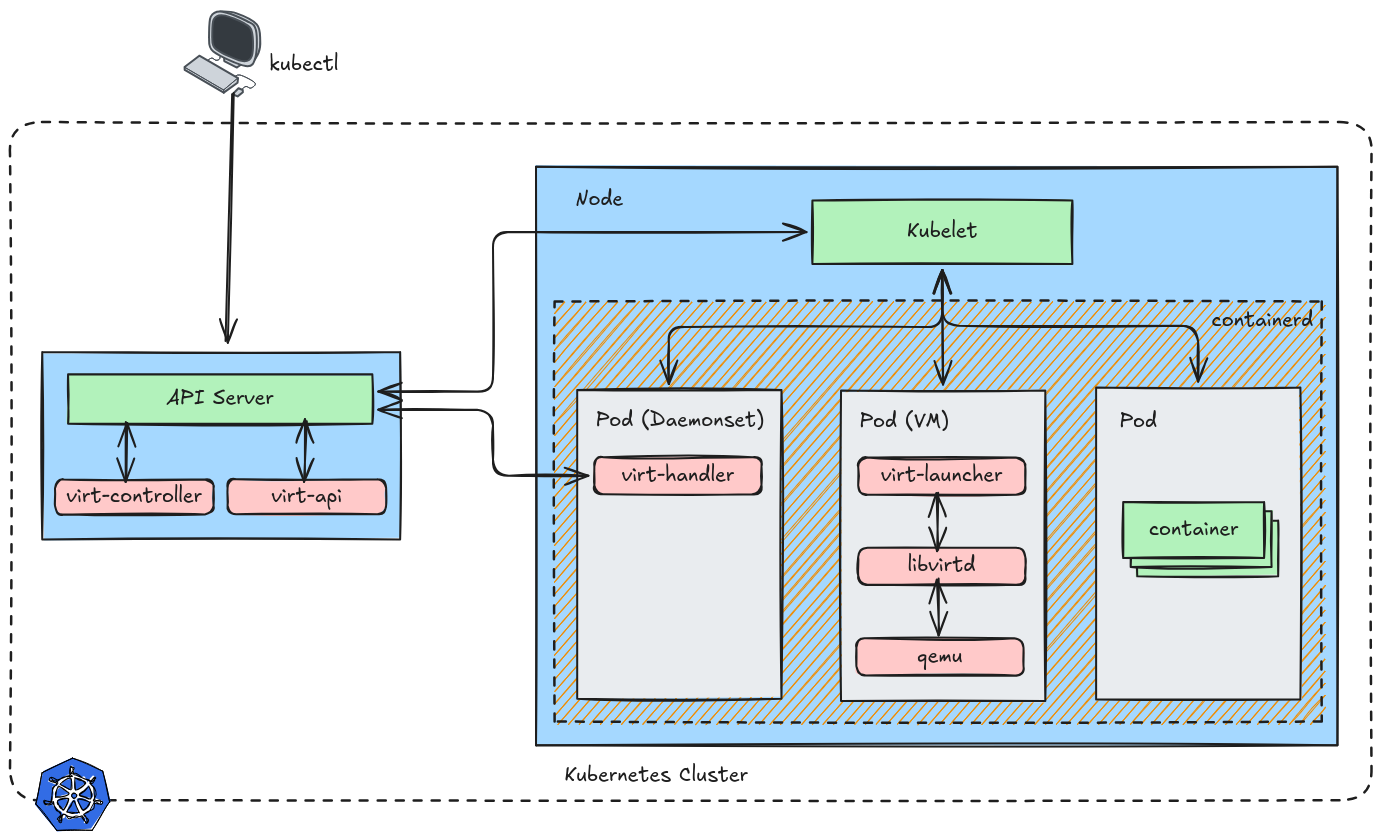
Architecture
KubeVirt integrates into Kubernetes using Custom Resource Definitions (CRDs) and controllers.
Main components:
KubeVirt Operator
- Installs and manages KubeVirt components
virt-controller
- Manages VM lifecycle (create, delete, migrate)
virt-handler
- Runs on each node (DaemonSet)
- Interfaces with the hypervisor (KVM)
virt-launcher
- Runs inside a Pod
- Hosts the actual VM
Deploy
KubeVirt
This process can be found here.
Deploy kubevirt operator.
1export VERSION=$(curl -s https://storage.googleapis.com/kubevirt-prow/release/kubevirt/kubevirt/stable.txt)
2echo $VERSION
3kubectl create -f "https://github.com/kubevirt/kubevirt/releases/download/${VERSION}/kubevirt-operator.yaml"
Deploy the KubeVirt custom resource definitions.
1kubectl create -f "https://github.com/kubevirt/kubevirt/releases/download/${VERSION}/kubevirt-cr.yaml"
Check the componets.
 1kubectl get all -n kubevirt
 2Warning: kubevirt.io/v1 VirtualMachineInstancePresets is now deprecated and will be removed in v2.
 3NAME                                  READY   STATUS    RESTARTS       AGE
 4pod/virt-api-7cc64fb85f-ns2qt         1/1     Running   1 (149m ago)   171m
 5pod/virt-api-7cc64fb85f-z6hfh         1/1     Running   1 (149m ago)   171m
 6pod/virt-controller-964c8dbcb-96tzj   1/1     Running   3 (46m ago)    170m
 7pod/virt-controller-964c8dbcb-m84wz   1/1     Running   3 (81m ago)    170m
 8pod/virt-handler-4ln4g                1/1     Running   0              170m
 9pod/virt-handler-fwsl2                1/1     Running   0              170m
10pod/virt-handler-pn6cn                1/1     Running   0              170m
11pod/virt-operator-68f69776bc-6z4p5    1/1     Running   3 (80m ago)    172m
12pod/virt-operator-68f69776bc-bccjh    1/1     Running   5 (44m ago)    172m
13
14NAME                                  TYPE        CLUSTER-IP      EXTERNAL-IP   PORT(S)   AGE
15service/kubevirt-operator-webhook     ClusterIP   10.43.63.183    <none>        443/TCP   171m
16service/kubevirt-prometheus-metrics   ClusterIP   None            <none>        443/TCP   171m
17service/virt-api                      ClusterIP   10.43.47.236    <none>        443/TCP   171m
18service/virt-exportproxy              ClusterIP   10.43.200.237   <none>        443/TCP   171m
19
20NAME                          DESIRED   CURRENT   READY   UP-TO-DATE   AVAILABLE   NODE SELECTOR            AGE
21daemonset.apps/virt-handler   3         3         3       3            3           kubernetes.io/os=linux   170m
22
23NAME                              READY   UP-TO-DATE   AVAILABLE   AGE
24deployment.apps/virt-api          2/2     2            2           171m
25deployment.apps/virt-controller   2/2     2            2           170m
26deployment.apps/virt-operator     2/2     2            2           172m
27
28NAME                                        DESIRED   CURRENT   READY   AGE
29replicaset.apps/virt-api-7cc64fb85f         2         2         2       171m
30replicaset.apps/virt-controller-964c8dbcb   2         2         2       170m
31replicaset.apps/virt-operator-68f69776bc    2         2         2       172m
32
33NAME                            AGE    PHASE
34kubevirt.kubevirt.io/kubevirt   172m   Deployed
Virtctl
KubeVirt provides an additional binary called virtctl for quick access to the serial and graphical ports of a VM and also handle start/stop operations.
1VERSION=$(kubectl get kubevirt.kubevirt.io/kubevirt -n kubevirt -o=jsonpath="{.status.observedKubeVirtVersion}")
2ARCH=$(uname -s | tr A-Z a-z)-$(uname -m | sed 's/x86_64/amd64/') || windows-amd64.exe
3echo ${ARCH}
4curl -L -o virtctl https://github.com/kubevirt/kubevirt/releases/download/${VERSION}/virtctl-${VERSION}-${ARCH}
5sudo install -m 0755 virtctl /usr/local/bin
Storage
KubeVirt can use PVC and PV but we need additional plugin to install to make it work.
1export VERSION=$(curl -s https://api.github.com/repos/kubevirt/containerized-data-importer/releases/latest | grep '"tag_name":' | sed -E 's/.*"([^"]+)".*/\1/')
2kubectl create -f https://github.com/kubevirt/containerized-data-importer/releases/download/$VERSION/cdi-operator.yaml
3kubectl create -f https://github.com/kubevirt/containerized-data-importer/releases/download/$VERSION/cdi-cr.yaml
Verify.
1kubectl get cdi -n cdi
2NAME   AGE     PHASE
3cdi    4h22m   Deployed
Network
KubeVirt uses Kubernetes networking (CNI), commonly used is Multus and Bridge Networking. But for the demo we’ll still be using Load Balancer.
Example
Unlike traditional VMs, KubeVirt runs VMs inside Pods. Let’s demonstrate a practical example here.
Let’s run a ubuntu vm inside kubernetes. Like in libvirt we usually first create storage for the VM, it’s the same with KubeVirt.
Data Volume
ubuntu-datavolume.yml
 1apiVersion: cdi.kubevirt.io/v1beta1
 2kind: DataVolume
 3metadata:
 4  name: "ubuntu-datavolume"
 5spec:
 6  source:
 7    http:
 8      url: "https://cloud-images.ubuntu.com/noble/20260307/noble-server-cloudimg-amd64.img"
 9  pvc:
10    accessModes:
11    - ReadWriteMany
12    resources:
13      requests:
14        storage: "50Gi"
1kubectl create -f ubuntu-datavolume.yml -n demo
This will create a 50GB Data Volume, that the vm can consume and will boot our Ubuntu VM.
Verify.
1kubectl get datavolume -n demo
2NAME                PHASE                  PROGRESS   RESTARTS   AGE
3ubuntu-datavolume   WaitForFirstConsumer   N/A                   84s
Virtual Machine
If you are here then you are familiar with cloud-init, define cpu, ram and also user parameter. Check some of my older post regarding cloud-init.
ubuntu-vm.yml
 1apiVersion: kubevirt.io/v1
 2kind: VirtualMachine
 3metadata:
 4  labels:
 5    kubevirt.io/os: linux
 6  name: ubuntu
 7spec:
 8  runStrategy: Always
 9  template:
10    metadata:
11      creationTimestamp: null
12      labels:
13        kubevirt.io/domain: ubuntu
14    spec:
15      domain:
16        cpu:
17          cores: 1
18        devices:
19          disks:
20          - disk:
21              bus: virtio
22            name: disk0
23          - cdrom:
24              bus: sata
25              readonly: true
26            name: cloudinitdisk
27        resources:
28          requests:
29            memory: 500M
30      volumes:
31      - name: disk0
32        persistentVolumeClaim:
33          claimName: ubuntu-datavolume
34      - cloudInitNoCloud:
35          userData: |
36            system_info:
37              default_user:
38                name: mcbtaguiad
39                home: /home/mcbtaguiad
40            password: AveryStrongPassword123456789!
41            chpasswd: { expire: False }
42            hostname: tags-k8s
43            ssh_pwauth: True
44            disable_root: false
45            ssh_authorized_keys:
46            - YOUR_PUBLIC_KEY
47            name: cloudinitdisk
1kubectl create -f ubuntu-vm.yml -n demo
Verify.
 1kubectl get all -n demo
 2Warning: kubevirt.io/v1 VirtualMachineInstancePresets is now deprecated and will be removed in v2.
 3NAME                             READY   STATUS    RESTARTS   AGE
 4pod/importer-ubuntu-datavolume   1/1     Running   0          33s
 5
 6NAME                                           PHASE              PROGRESS   RESTARTS   AGE
 7datavolume.cdi.kubevirt.io/ubuntu-datavolume   ImportInProgress   82.46%                8m22s
 8
 9NAME                                        AGE   PHASE     IP    NODENAME   READY
10virtualmachineinstance.kubevirt.io/ubuntu   54s   Pending                    False
11
12NAME                                AGE   STATUS     READY
13virtualmachine.kubevirt.io/ubuntu   54s   Starting   False
We can see here the the importer is running, if you check the progress on datavolume it is progressing to 100%. Also the VM Instance is still pending, we can verify that the VM is running when the import is complete.
 1kubectl get all -n demo
 2Warning: kubevirt.io/v1 VirtualMachineInstancePresets is now deprecated and will be removed in v2.
 3NAME                             READY   STATUS    RESTARTS   AGE
 4pod/virt-launcher-ubuntu-2rwqz   2/2     Running   0          2m30s
 5
 6NAME                                           PHASE       PROGRESS   RESTARTS   AGE
 7datavolume.cdi.kubevirt.io/ubuntu-datavolume   Succeeded   100.0%                11m
 8
 9NAME                                        AGE     PHASE     IP              NODENAME   READY
10virtualmachineinstance.kubevirt.io/ubuntu   3m55s   Running   172.16.235.45   master03   True
11
12NAME                                AGE     STATUS    READY
13virtualmachine.kubevirt.io/ubuntu   3m55s   Running   True
The VM is now running.
Console
To connect to the VM we use virtctl, quite similar to virsh. Same with virsh use the domain we set ubuntu.
1virtctl console ubuntu -n demo
2Successfully connected to ubuntu console. Press Ctrl+] or Ctrl+5 to exit console.
3
4tags-k8s login: mcbtaguiad
Explore other options with virtctl --help.
Service
Like pods/container in Kubernetes we can also attach service/network to the Virtual Machine instance.
Make sure to put the correct selector, it’s the label we set when creating the Virtual Machine kubevirt.io/domain: ubuntu.
ubuntu-svc.yml
 1apiVersion: v1
 2kind: Service
 3metadata:
 4  name: ubuntu-svc
 5  annotations:
 6    metallb.universe.tf/address-pool: metallb-ip-pool
 7spec:
 8  type: LoadBalancer
 9  selector:
10    kubevirt.io/domain: ubuntu
11  ports:
12    - port: 22
13      targetPort: 22
1kubectl create -f ubuntu-svc.yml -n demo
Verify.
1kubectl get svc -n demo
2NAME         TYPE           CLUSTER-IP     EXTERNAL-IP       PORT(S)        AGE
3ubuntu-svc   LoadBalancer   10.43.73.139   192.168.254.220   22:30099/TCP   4s
SSH to the VM using the external IP.
 1ssh 192.168.254.220
 2Are you sure you want to continue connecting (yes/no/[fingerprint])? yes
 3Warning: Permanently added '192.168.254.220' (ED25519) to the list of known hosts.
 4Welcome to Ubuntu 24.04.4 LTS (GNU/Linux 6.8.0-101-generic x86_64)
 5
 6 * Documentation:  https://help.ubuntu.com
 7 * Management:     https://landscape.canonical.com
 8 * Support:        https://ubuntu.com/pro
 9
10 System information as of Thu Mar 19 10:40:49 UTC 2026
11
12  System load:  0.08               Processes:               112
13  Usage of /:   13.8% of 11.78GB   Users logged in:         0
14  Memory usage: 19%                IPv4 address for enp1s0: 172.16.235.45
15  Swap usage:   0%
16
17Expanded Security Maintenance for Applications is not enabled.
18
190 updates can be applied immediately.
20
21Enable ESM Apps to receive additional future security updates.
22See https://ubuntu.com/esm or run: sudo pro status
23
24
25The list of available updates is more than a week old.
26To check for new updates run: sudo apt update
27
28
29The programs included with the Ubuntu system are free software;
30the exact distribution terms for each program are described in the
31individual files in /usr/share/doc/*/copyright.
32
33Ubuntu comes with ABSOLUTELY NO WARRANTY, to the extent permitted by
34applicable law.
35
36To run a command as administrator (user "root"), use "sudo <command>".
37See "man sudo_root" for details.
38
39mcbtaguiad@tags-k8s:~$