Kubernetes Notes - Pod
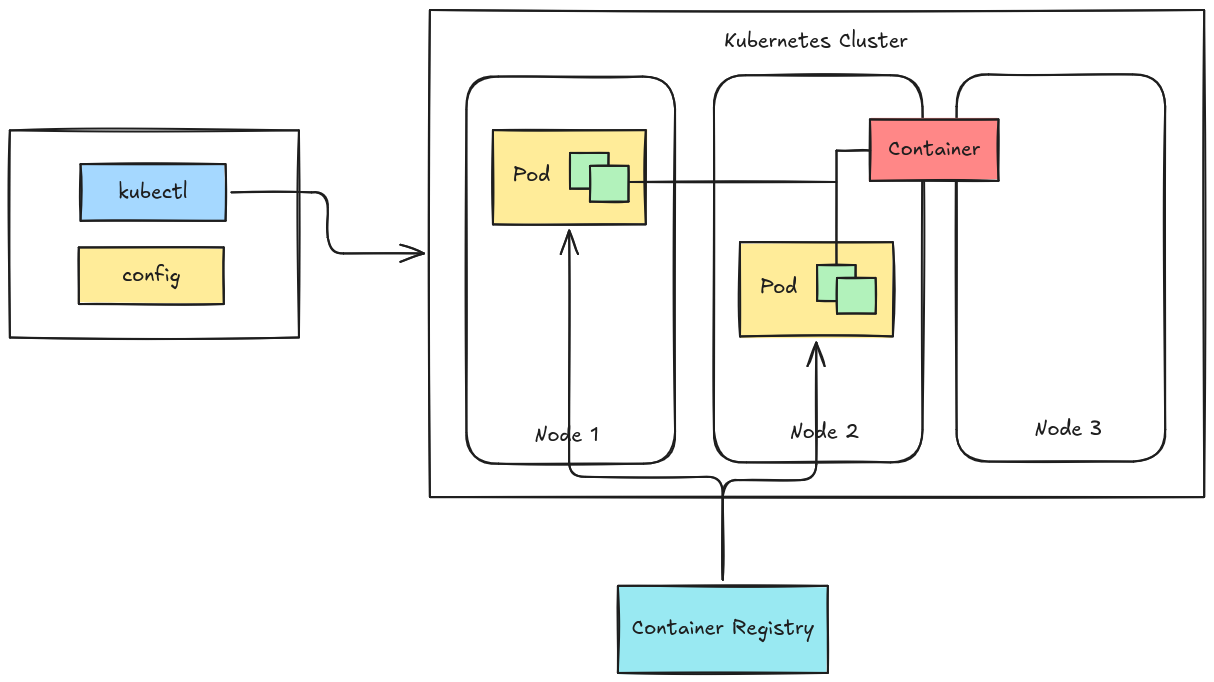 In Kubernetes, you do not deploy containers directly. Instead, containers run inside a Pod, which acts as a wrapper around one or more containers. Pods are the smallest deployable unit in the Kubernetes.
A Pod provides:
- Shared specification for containers
- Shared storage (volumes)
- Shared network
Table of Contents
Kubeconfig
Before we deploy pods, let’s first discuss kubeconfig for cluster access. Check this link for further explanation.
First find your kubeconfig file of your cluster, if the cluster is created using kubeadm it is located at /etc/kubernetes/admin.conf, if your using k3s then it is at /etc/rancher/k3s/k3s.yaml.
Copy the config to your workstation and export it to your environment. Make sure to change the IP in the config.
1export KUBECONFIG=~/.config/admin.yaml
You can also use this context without setting it in your environment; add this to kubectl command everytime you run it.
1kubectl --kubeconfig ~/.config/k3s.yaml
Creating Pods with kubectl
You can create a quick Pod using the command line:
1kubectl run nginx --image=nginx
This method is useful for:
- testing
- experiments
- temporary workloads
However, for real deployments, YAML files are preferred.
Using YAML for Kubernetes Resources
Kubernetes objects are usually defined using YAML manifests.
Advantages of YAML:
- version control (Git)
- reproducibility
- easy sharing with teams
Using the same image earlier
nginx.
1kind: Pod
2apiVersion: v1
3metadata:
4  name: my-pod
5spec:
6  containers:
7    - name: app
8      image: nginx
To deploy.
1kubectl apply -f pod.yaml
This declares the desired state of the system.
Multiple Pods
This demonstrates a Pod containing two containers that communicate via a shared volume. Let’s use ubuntu and nginx images, the two pod will share the same volume.
Workflow; pod1 will create the index.html file in /usr/share/nginx/html that will be serve by pod2.
Manifest
deploy.yaml
 1apiVersion: v1
 2kind: Pod
 3metadata:
 4  name: pod-demo
 5spec:
 6  containers:
 7    - name: pod1
 8      image: ubuntu
 9      volumeMounts:
10        - name: queue
11          mountPath: /usr/share/nginx/html
12      command: ["/bin/sh"]
13      args:
14        - -c
15        - |
16          echo "<html>\n<!-- <h2>  </h2> -->\n<h3>my first website</h3>\n<p>look at me mom i'm a devops.</p>" > /usr/share/nginx/html/index.html
17          sleep 3600
18
19    - name: pod2
20      image: nginx
21      ports:
22        - containerPort: 80
23      volumeMounts:
24        - name: queue
25          mountPath: /usr/share/nginx/html
26  volumes:
27    - name: queue
28      emptyDir: {}
Namespace
To make this pod issolated with other deployment let’s create a namespace for this deployment.
1kubectl create ns demo
Deploy
Deploy the pod.
1kubectl create -f pod.yaml -n demo
Listing the Pod
Check if the pod is now running.
1kubectl get pods -n demo
2NAME       READY   STATUS    RESTARTS   AGE
3pod-demo   2/2     Running   0          61s
Verify
You can verify the shared volume by executing inside the pod.
 1➜  ~ kubectl exec -it pod-demo -c pod1 -n demo -- cat /usr/share/nginx/html/index.html
 2<html>
 3<!-- <h2>  </h2> -->
 4<h3>my first website</h3>
 5<p>look at me mom i'm a devops.</p>
 6
 7➜  ~ kubectl exec -it pod-demo -c pod2 -n demo -- curl localhost
 8<html>
 9<!-- <h2>  </h2> -->
10<h3>my first website</h3>
11<p>look at me mom i'm a devops.</p>
12➜  ~
Or port-forward the port of pod2 and curl in your localhost.
1➜  ~ kubectl port-forward pod/pod-demo 8080:80 -n demo
2Forwarding from 127.0.0.1:8080 -> 80
3Forwarding from [::1]:8080 -> 80
4
5➜  ~ curl localhost:8080
6-e <html>
7<!-- <h2>  </h2> -->
8<h3>my first website</h3>
9<p>look at me mom i'm a devops.</p>
Pod Lifecycle
Pods follow a lifecycle with several phases.
Pending
The Pod has been accepted but containers are not yet started.
Possible reasons:
- image pulling
- scheduling delay
Running
The Pod has been assigned to a node and containers are running.
Succeeded
All containers completed successfully.
Common for:
- batch jobs
- scripts
Failed
At least one container terminated with an error.
Completed / Terminated
All containers have stopped execution.
Pod Readiness and Liveliness Probe
Pod lifecycle is quite a bit topic, you can check here if you are interested. For now I’ll discuss about Readiness Probe and Liveliness Probe of a Pod. If you are here then you are familiar with Docker/Podman health check, it is quite similar to that but this two probe serve different purposes.
Liveness Probe
Checks if the container is still running correctly. If the liveness probe fails, Kubernetes will restart the container.
Example Scenario:
- Your app is stuck in a deadlock or infinite loop.
- The container is still running but not functioning properly.
1livenessProbe:
2  httpGet:
3    path: /
4    port: 80
5  initialDelaySeconds: 10
6  periodSeconds: 5
Readiness Probe
Checks if the container is ready to receive traffic. If the readiness probe fails, Kubernetes will remove the pod from the Service endpoints, but will NOT restart it.
Example Scenario:
- Your app is starting up or loading data and not ready yet.
1readinessProbe:
2  httpGet:
3    path: /
4    port: 80
5  initialDelaySeconds: 5
6  periodSeconds: 5
Kubernetes will stop sending traffic to the pod. When it is ready again, traffic resumes.
Demo
probe.yaml
 1apiVersion: v1
 2kind: Pod
 3metadata:
 4  name: nginx-probe-demo
 5spec:
 6  containers:
 7  - name: nginx
 8    image: nginx
 9    ports:
10      - containerPort: 80
11
12    livenessProbe:
13      httpGet:
14        path: /
15        port: 80
16      initialDelaySeconds: 15
17      periodSeconds: 10
18      failureThreshold: 3
19
20    readinessProbe:
21      httpGet:
22        path: /
23        port: 80
24      initialDelaySeconds: 5
25      periodSeconds: 5
26      failureThreshold: 3
Deploy.
1kubectl apply -f probe.yaml -n demo
Check if probe passed.
1kubectl describe pod nginx-probe-demo -n demo
 1Name:             nginx-probe-demo
 2Namespace:        demo
 3Priority:         0
 4Service Account:  default
 5Node:             master03/192.168.254.203
 6Start Time:       Mon, 09 Mar 2026 17:07:20 +0800
 7Labels:           <none>
 8Annotations:      cni.projectcalico.org/containerID: 5c26b3425666c824b56642a51eb09683416cf90ec515c0028a14e6e7a0b47fb7
 9                  cni.projectcalico.org/podIP: 172.16.235.38/32
10                  cni.projectcalico.org/podIPs: 172.16.235.38/32
11Status:           Running
12IP:               172.16.235.38
13IPs:
14  IP:  172.16.235.38
15Containers:
16  nginx:
17    Container ID:   containerd://6d5107d125886a9e32bd3c399d3481652ea29bee2688ca5c01f3b4ceffebb118
18    Image:          nginx
19    Image ID:       docker.io/library/nginx@sha256:0236ee02dcbce00b9bd83e0f5fbc51069e7e1161bd59d99885b3ae1734f3392e
20    Port:           80/TCP
21    Host Port:      0/TCP
22    State:          Running
23      Started:      Mon, 09 Mar 2026 17:07:23 +0800
24    Ready:          True
25    Restart Count:  0
26    Liveness:       http-get http://:80/ delay=15s timeout=1s period=10s #success=1 #failure=3
27    Readiness:      http-get http://:80/ delay=5s timeout=1s period=5s #success=1 #failure=3
28    Environment:    <none>
29    Mounts:
30      /var/run/secrets/kubernetes.io/serviceaccount from kube-api-access-vkzwv (ro)
31Conditions:
32  Type                        Status
33  PodReadyToStartContainers   True
34  Initialized                 True
35  Ready                       True
36  ContainersReady             True
37  PodScheduled                True
38Volumes:
39  kube-api-access-vkzwv:
40    Type:                    Projected (a volume that contains injected data from multiple sources)
41    TokenExpirationSeconds:  3607
42    ConfigMapName:           kube-root-ca.crt
43    Optional:                false
44    DownwardAPI:             true
45QoS Class:                   BestEffort
46Node-Selectors:              <none>
47Tolerations:                 node.kubernetes.io/not-ready:NoExecute op=Exists for 300s
48                             node.kubernetes.io/unreachable:NoExecute op=Exists for 300s
49Events:
50  Type    Reason     Age   From               Message
51  ----    ------     ----  ----               -------
52  Normal  Scheduled  43s   default-scheduler  Successfully assigned demo/nginx-probe-demo to master03
53  Normal  Pulling    42s   kubelet            Pulling image "nginx"
54  Normal  Pulled     40s   kubelet            Successfully pulled image "nginx" in 2.066s (2.066s including waiting). Image size: 62944796 bytes.
55  Normal  Created    40s   kubelet            Created container: nginx
56  Normal  Started    40s   kubelet            Started container nginx
Under Conditon section, we can see that it all passed/success.
Pods Are Ephemeral
Pods are temporary by design.
They can disappear if:
- the node fails
- the Pod crashes
- the Pod is deleted
- the cluster reschedules workloads
Because of this, in real systems Pods are usually managed by higher-level controllers such as:
- Deployments
- Statefulsets
- Daemonsets
- Jobs
These controllers recreate Pods automatically when they fail.
Clean Up
Since pod has no controller managing it, a pod deleted is gone permanently because nothing is responsible for recreating it. I’ll discuss and demonstrate these in next part where we discuss controllers.
1kubectl delete pod pod-demo -n demo
2kubectl delete pod nginx-probe-demo -n demo
Or just simply use the YAML files.
1kubectl delete -f deploy.yaml -n demo
2kubectl delete -f probe.yaml -n demo
3
4# or
5kubectl delete -f . -n demo
Bonus
If you are wondering what is the difference of kubectl apply and kubectl create. kubectl create is used to create resources for the first time. If the resources already exist, the command will fail. kubectl apply is used to create or update resources declaratively.