Linux Networking
Table of Contents
Show network
To view your current network interface.
 1$ ip addr show
 21: lo: <LOOPBACK,UP,LOWER_UP> mtu 65536 qdisc noqueue state UNKNOWN group default qlen 1000
 3    link/loopback 00:00:00:00:00:00 brd 00:00:00:00:00:00
 4    inet 127.0.0.1/8 brd 127.255.255.255 scope host lo
 5       valid_lft forever preferred_lft forever
 6    inet6 ::1/128 scope host proto kernel_lo
 7       valid_lft forever preferred_lft forever
 82: eth0: <NO-CARRIER,BROADCAST,MULTICAST,UP> mtu 1500 qdisc fq_codel state DOWN group default qlen 1000
 9    link/ether 54:e1:ad:b0:bf:5d brd ff:ff:ff:ff:ff:ff
103: wlan0: <BROADCAST,MULTICAST,UP,LOWER_UP> mtu 1500 qdisc noqueue state UP group default qlen 1000
11    link/ether bc:a8:a6:98:05:a8 brd ff:ff:ff:ff:ff:ff
12    inet 192.168.254.192/24 brd 192.168.254.255 scope global dynamic noprefixroute wlan0
13       valid_lft 249493sec preferred_lft 249493sec
14    inet6 fe80::193e:9bd2:aa42:e81/64 scope link noprefixroute
15       valid_lft forever preferred_lft forever
164: virbr0: <NO-CARRIER,BROADCAST,MULTICAST,UP> mtu 1500 qdisc htb state DOWN group default qlen 1000
17    link/ether 52:54:00:c7:c0:51 brd ff:ff:ff:ff:ff:ff
18    inet 192.168.154.10/24 brd 192.168.154.255 scope global virbr0
19       valid_lft forever preferred_lft forever
20
21# show config specific interface
22ip addr show eth0
To see statistic of packet transmission and errors with each interface.
 1$ ip -s addr show
 21: lo: <LOOPBACK,UP,LOWER_UP> mtu 65536 qdisc noqueue state UNKNOWN group default qlen 1000
 3    link/loopback 00:00:00:00:00:00 brd 00:00:00:00:00:00
 4    inet 127.0.0.1/8 brd 127.255.255.255 scope host lo
 5       valid_lft forever preferred_lft forever
 6    inet6 ::1/128 scope host proto kernel_lo
 7       valid_lft forever preferred_lft forever
 8    RX:  bytes packets errors dropped  missed   mcast
 9      22634840    7482      0       0       0       0
10    TX:  bytes packets errors dropped carrier collsns
11      22634840    7482      0       0       0       0
122: eth0: <NO-CARRIER,BROADCAST,MULTICAST,UP> mtu 1500 qdisc fq_codel state DOWN group default qlen 1000
13    link/ether 54:e1:ad:b0:bf:5d brd ff:ff:ff:ff:ff:ff
14    RX:  bytes packets errors dropped  missed   mcast
15             0       0      0       0       0       0
16    TX:  bytes packets errors dropped carrier collsns
17             0       0      0       0       0       0
183: wlan0: <BROADCAST,MULTICAST,UP,LOWER_UP> mtu 1500 qdisc noqueue state UP group default qlen 1000
19    link/ether bc:a8:a6:98:05:a8 brd ff:ff:ff:ff:ff:ff
20    inet 192.168.254.192/24 brd 192.168.254.255 scope global dynamic noprefixroute wlan0
21       valid_lft 249447sec preferred_lft 249447sec
22    inet6 fe80::193e:9bd2:aa42:e81/64 scope link noprefixroute
23       valid_lft forever preferred_lft forever
24    RX:  bytes packets errors dropped  missed   mcast
25    1246317857 1065909      0       0       0       0
26    TX:  bytes packets errors dropped carrier collsns
27      67984061  239361      0      14       0       0
284: virbr0: <NO-CARRIER,BROADCAST,MULTICAST,UP> mtu 1500 qdisc htb state DOWN group default qlen 1000
29    link/ether 52:54:00:c7:c0:51 brd ff:ff:ff:ff:ff:ff
30    inet 192.168.154.10/24 brd 192.168.154.255 scope global virbr0
31       valid_lft forever preferred_lft forever
32    RX:  bytes packets errors dropped  missed   mcast
33             0       0      0       0       0       0
34    TX:  bytes packets errors dropped carrier collsns
35             0       0      0       8       0       0
36
37# Alternative command
38ifconfig
Setting your network
If your setup is for desktop or PC stick with DHCP, it will automatically get configuration from your router. For static, this would be much complicated in linux - specially if you don’t have a desktop environment installed.
Native
If no service installed to handle network.
 1ip addr add 192.168.254.168/24 dev eth0
 2ip route add default via 192.168.254.254
 3
 4# up interface
 5ip link set eth0 up
 6
 7
 8$ ip a
 92: eth0: <BROADCAST,MULTICAST,UP,LOWER_UP> mtu 1500 qdisc fq_codel state UP group default qlen 1000
10    link/ether 54:e1:ad:b0:bf:5d brd ff:ff:ff:ff:ff:ff
11    inet 192.168.254.168/24 scope global eth0
12       valid_lft forever preferred_lft forever
13    inet6 fe80::56e1:adff:feb0:bf5d/64 scope link proto kernel_ll
14       valid_lft forever preferred_lft forever
15
16$ ip route
17ip route
18default via 192.168.254.254 dev eth0
19127.0.0.0/8 via 127.0.0.1 dev lo
20
21# To delete current config
22ip addr del 192.168.254.168/24 dev eth0
23ip route del default via 192.168.254.254 dev eth0
Extra tip regarding route, for some weird scenario that you missed configured one of your interface. And you want network to default to specific interface, change the metric on the routing table.
 1$ ip r
 2default via 192.168.254.254 dev wlan0 metric 200
 3default via 192.168.254.254 dev eth0 metric 4294965247
 4
 5
 6ip route del default via 192.168.254.254 dev eth0 metric 4294965247
 7ip route add default via 192.168.254.254 dev eth0 metric 100
 8
 9$ ip r
10default via 192.168.254.254 dev eth0 metric 100
11default via 192.168.254.254 dev wlan0 metric 200
Network Manager
For easier setup you can install NetworkManager and use nmtui, this will lunch a interface in the terminal to configure your network.
With NetworkManager you can also use nmcli.
 1# ethernet
 2nmcli connection add type ethernet con-name "Ethernet connection 1" ifname eth0
 3nmcli connection modify "Ethernet connection 1" ipv4.method manual ipv4.addresses 192.168.1.100/24 ipv4.gateway 192.168.1.1 ipv4.dns "8.8.8.8 8.8.4.4" ipv4.ignore-auto-dns yes
 4nmcli connection down "Ethernet connection 1"
 5nmcli connection up "Ethernet connection 1"
 6
 7# wireless
 8nmcli radio wifi on
 9nmcli device wifi list        #this will scan available wifi
10nmcli device wifi connect "Your_SSID_Name" password "Your_Password"
11# or
12nmcli device wifi connect "Your_SSID_Name" --ask
13sudo nmcli device wifi connect "Your_SSID_Name"
Networkd
Using systemd-networkd, configuration is created in /etc/systemd/network with number prefix for priority e.g 10-wired.network.
10-wired.network
1[Match]
2Name=eth0
3
4[Network]
5Address=192.168.1.100/24 # Your desired IP and subnet mask
6Gateway=192.168.1.1
7DNS=8.8.8.8
Connecting to wireless connection with systemd-netword as backend would need to install iwd or wpa_supplicant. If you’ve install Arch linux then you should be familiar with iwd.
Netplan
This usually comes default with ubuntu server, it uses YAML file and networkd or NetworkManager as backend. Configuration is in /etc/netplan/ with indexing support.
10-eth0-.yaml
 1network:
 2  version: 2
 3  renderer: networkd # Or NetworkManager
 4  ethernets:
 5    enp0s3:
 6      dhcp4: no
 7      addresses: [192.168.1.100/24]
 8      routes:
 9        - to: default
10          via: 192.168.1.1
11      nameservers:
12        addresses: [1.1.1.1, 8.8.8.8]
20-wlan0-.yaml
 1network:
 2  version: 2
 3  renderer: networkd # Or NetworkManager
 4  wifis:
 5    wlan0:
 6      dhcp4: yes
 7      dhcp6: yes
 8      access-points:
 9        "YOURWIFINAME":
10          password: "averysecurewifipassword"
11      nameservers:
12        addresses: [1.1.1.1, 8.8.8.8]
Other Wireless Solutions
iwd
1iwctl
2[iwd]# device list
3[iwd]# station wlan0 scan
4[iwd]# station wlan0 get-networks
5[iwd]# station wlan0 connect SSID
wpa_supplicant
/etc/wpa_supplicant/wpa_supplicant-wlan0.conf
1ctrl_interface=/var/run/wpa_supplicant
2ap_scan=1
3
4network={
5    ssid="Your_WiFi_Name"
6    psk="Your_WiFi_Password" # Use wpa_passphrase for encrypted PSK
7}
/etc/systemd/network/10-wireless.network
1[Match]
2Name=wlan0 # Or your interface name (e.g., wlp60s0)
3
4[Network]
5DHCP=yes
6# For static IP:
7# Address=192.168.1.100/24
8# Gateway=192.168.1.1
9# DNS=1.1.1.1
1sudo systemctl enable systemd-networkd
2sudo systemctl enable wpa_supplicant@wlan0 # Replace wlan0 if needed
3sudo systemctl start systemd-networkd
4sudo systemctl start wpa_supplicant@wlan0 # Replace wlan0 if needed
Connman
My current setup is using open-rc to handle services and connman for network. This is not supported by netplan, it is recommended for desktop or laptop.
1yay -S connman connman-openrc
2rc-update add connmand default
3rc-service connmand start
1wired
2connmanctl
3connmanctl> enable ethernet
4ethernet is already enabled
5connmanctl> services
6*AR Wired                ethernet_54e1adb0bf5d_cable
7
8connmanctl config ethernet_54e1adb0bf5d_cable --ipv4 manual 192.168.254.69 255.255.255.0 192.168.254.254 --nameservers 8.8.8.8 1.1.1.1
 1# wireless
 2connmanctl enable wifi
 3connmactl
 4connmanctl> scan wifi
 5Scan completed for wifi
 6connmanctl services
 7
 8# to connect to an open network, use the second field beginning with wifi_:
 9Pakabit Ka ng Net    wifi_bca8a69805a8_50616b61626974204b61206e67204e6574_managed_psk
10
11connmanctl> agent on
12connmanctl> connect wifi_bca8a69805a8_50616b61626974204b61206e67204e6574_managed_psk
13Agent RequestInput wifi_bca8a69805a8_50616b61626974204b61206e67204e6574_managed_psk
14  Passphrase = [ Type=psk, Requirement=mandatory ]
15  Passphrase?
16
17
18connmanctl> quit
Additional info; if you migrated from NetworkManager to connman, then there is a chance that bluetooth will be disabled.
1connmanctl technologies
2connmanctl enable bluetooth
DNS Resolution
In your network, without using a DNS server you can set a DNS resolution for an IP using /etc/hosts.
/etc/hosts
1# Standard host addresses
2127.0.0.1  localhost
3::1        localhost ip6-localhost ip6-loopback
4ff02::1    ip6-allnodes
5ff02::2    ip6-allrouters
6# This host address
7127.0.1.1  tags-p51
8
9192.168.254.192 tags-deb-001
To show your hostname or rename.
/etc/hostname
1$ hostname
2tags-p51
3
4$ hostnamectl set-hostname your-hostname
5
6# or just edit the file
7vim /etc/hostname
Testing with pinging tags-deb-001
1$ ping -c 5 tags-deb-001
2PING tags-deb-001 (192.168.254.192) 56(84) bytes of data.
364 bytes from tags-deb-001 (192.168.254.192): icmp_seq=1 ttl=64 time=0.093 ms
464 bytes from tags-deb-001 (192.168.254.192): icmp_seq=2 ttl=64 time=0.051 ms
564 bytes from tags-deb-001 (192.168.254.192): icmp_seq=3 ttl=64 time=0.068 ms
664 bytes from tags-deb-001 (192.168.254.192): icmp_seq=4 ttl=64 time=0.025 ms
764 bytes from tags-deb-001 (192.168.254.192): icmp_seq=5 ttl=64 time=0.075 ms
To change the DNS of your server. For temporary overwrite the DNS you can edit /etc/resolv.conf. But if network is managed Network Manager or similar service this will be overwritten on the next boot.
/etc/resolv.conf
1nameserver 8.8.8.8
2nameserver 8.8.4.4
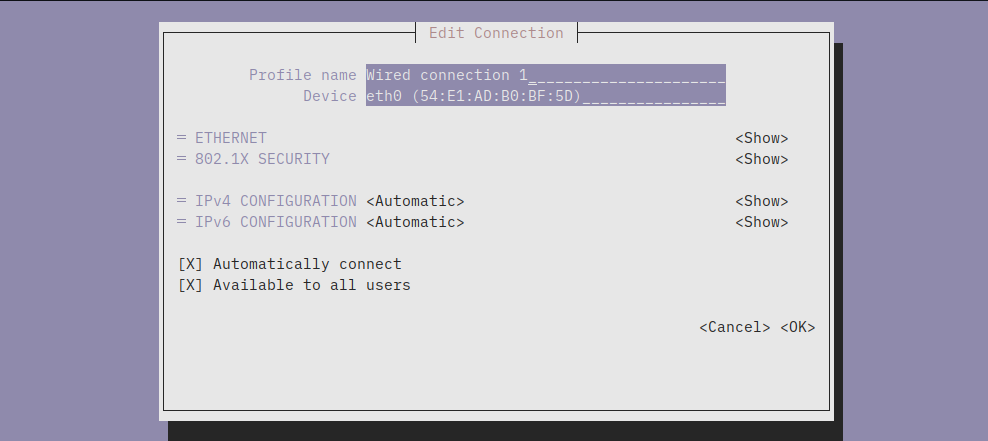
Using nmtui or nmcli
1# manual edit using nmtui interface
2nmtui
3
4# nmcli
5sudo nmcli connection modify "Wired connection 1" ipv4.dns "8.8.8.8, 8.8.4.4"
6sudo nmcli connection modify "Wired connection 1" ipv4.ignore-auto-dns yes
Bridges
A network bridge connects multiple network interfaces at Layer 2 (Ethernet) so they behave like they’re on the same switch. This is commonly used by VM and containers to have direct access to the physcal LAN.
Using ip command (temporary / runtime)
This is not persistent and will be removed after reboot.
 1# create bridge
 2ip link add br0 type bridge
 3
 4# add interface to bridge
 5ip link set eth0 master br0
 6
 7# bring interfaces up
 8ip link set br0 up
 9ip link set eth0 up
10
11# assign IP to bridge
12ip addr add 192.168.1.10/24 dev br0
13ip route add default via 192.168.1.1
Using systemd-networkd
Create bridge interface. /etc/systemd/network/br0.netdev
1[NetDev]
2Name=br0
3Kind=bridge
Configure bridge interface. /etc/systemd/network/br0.network
1[Match]
2Name=br0
3
4[Network]
5Address=192.168.1.10/24
6Gateway=192.168.1.1
7DNS=8.8.8.8
On your physical nic, add bridge. /etc/systemd/network/eth0.network
1[Match]
2Name=eth0
3
4[Network]
5Bridge=br0
Restart service.
1systemctl enable systemd-networkd
2systemctl restart systemd-networkd
Using Network Manager
 1# create bridge
 2nmcli con add type bridge ifname br0 con-name br0
 3
 4# set IP
 5nmcli con modify br0 ipv4.method manual \
 6  ipv4.addresses 192.168.1.10/24 \
 7  ipv4.gateway 192.168.1.1 \
 8  ipv4.dns 8.8.8.8
 9
10# add slave interface
11nmcli con add type ethernet ifname eth0 master br0
12
13# bring up bridge
14nmcli con up br0
Using Netplan
/etc/netplan/01-bridge.yaml
 1network:
 2  version: 2
 3  renderer: networkd
 4  ethernets:
 5    eth0:
 6      dhcp4: no
 7
 8  bridges:
 9    br0:
10      interfaces: [eth0]
11      addresses: [192.168.1.10/24]
12      gateway4: 192.168.1.1
13      nameservers:
14        addresses: [8.8.8.8]
Apply.
1netplan apply
Bonding
Bonding two ethernet, working as backup active load-balancing. Also a reminder how careless sometimes when configuring network. Make sure to buy a serial cable in case you messed up your config. Messing up my homelab has become a very dangerous hobby of mine, but weirdly enough I take pride and joy in it (evil laugh).
Setup
If you are configuring this on a SSH client, then better be prepared when you lost connection due to miss configuration. Make sure you have a serial cable or if your server has a physical interface.
Identify your network interface card. For my setup these are enp5s0 and eno1. Note that wifi plus ethernet is also possible.
 1$ ip show link
 21: lo: <LOOPBACK,UP,LOWER_UP> mtu 65536 qdisc noqueue state UNKNOWN mode DEFAULT group default qlen 1000
 3    link/loopback 00:00:00:00:00:00 brd 00:00:00:00:00:00
 42: enp5s0: <BROADCAST,MULTICAST,SLAVE,UP,LOWER_UP> mtu 1500 qdisc mq master bond0 state UP mode DEFAULT group default qlen 1000
 5    link/ether 00:30:64:5c:e2:4b brd ff:ff:ff:ff:ff:ff
 63: eno1: <BROADCAST,MULTICAST,SLAVE,UP,LOWER_UP> mtu 1500 qdisc fq_codel master bond0 state UP mode DEFAULT group default qlen 1000
 7    link/ether d6:98:ed:47:ea:de brd ff:ff:ff:ff:ff:ff permaddr 00:30:64:5c:e2:4a
 8    altname enp0s25
 9
10# OR
11
121: lo: <LOOPBACK,UP,LOWER_UP> mtu 65536 qdisc noqueue state UNKNOWN group default qlen 1000
13    link/loopback 00:00:00:00:00:00 brd 00:00:00:00:00:00
14    inet 127.0.0.1/8 scope host lo
15       valid_lft forever preferred_lft forever
16    inet6 ::1/128 scope host noprefixroute
17       valid_lft forever preferred_lft forever
182: enp5s0: <BROADCAST,MULTICAST,SLAVE,UP,LOWER_UP> mtu 1500 qdisc mq master bond0 state UP group default qlen 1000
19    link/ether 00:30:64:5c:e2:4b brd ff:ff:ff:ff:ff:ff
203: eno1: <BROADCAST,MULTICAST,SLAVE,UP,LOWER_UP> mtu 1500 qdisc fq_codel master bond0 state UP group default qlen 1000
21    link/ether d6:98:ed:47:ea:de brd ff:ff:ff:ff:ff:ff permaddr 00:30:64:5c:e2:4a
22    altname enp0s25
If you are using Ubuntu then you are probably using networkd. For some reason you changed your networking with NetworkManager then I can help you (hahaha kidding, madness! I’m talking to my future self who forgot to do this shits).
First check current config of your system, you probably configured your server to be in DHCP mode. For networkd check in /etc/network, for NetworkManager you can use nmtui or nmcli to easily check existing config. Some server also configured its config in /etc/netplan.
Once you deleted (make backup) the current config, dont restart the network service yet (I know you are using SSH), create a config /etc/netplan/01-bonding.yaml.
01-bonding.yaml
 1network:
 2  version: 2
 3  renderer: networkd
 4  ethernets:
 5    eno1:
 6      dhcp4: false
 7      dhcp6: false
 8    enp5s0:
 9      dhcp4: false
10      dhcp6: false
11  bonds:
12    bond0:
13      interfaces: [enp5s0, eno1]
14      parameters:
15        mode: balance-alb #active-backup
16        #primary: enp5s0
17        mii-monitor-interval: 100
18      addresses:
19        - 192.168.1.69/24
20      #gateway4: 192.168.1.1
21      routes:
22        - to: default
23          via: 192.168.1.1
24      nameservers:
25        addresses: [1.1.1.1, 8.8.8.8]
Easy right, depending on your use case, for this setup I’ve set it to balance-alb. For reference here are the other mode (copy pasted from the internet).
- Active-Backup (mode=1)
Behavior: Only one slave is active. Backup takes over if the active fails.
Switch requirement: None
Use case: Simple failover, compatible with any switch.
- Balance-rr (mode=0) – Round-robin
Behavior: Packets are sent in round-robin order across all slaves.
Switch requirement: None, but may cause out-of-order packets.
Use case: Simple load balancing across multiple NICs.
- Balance-xor (mode=2) – XOR policy
Behavior: Selects slave based on MAC addresses (source XOR dest).
Switch requirement: Must support 802.3ad or static config.
Use case: Load balancing with predictable path selection.
- 802.3ad (mode=4) – LACP (Link Aggregation)
Behavior: Uses LACP protocol to combine links.
Switch requirement: Switch must support LACP.
Use case: True link aggregation with load balancing and redundancy.
- Balance-tlb (mode=5) – Adaptive transmit load balancing
Behavior: Transmit only, uses load on each slave to balance.
Switch requirement: None
Use case: Good for outgoing traffic load balancing
- Balance-alb (mode=6) – Adaptive load balancing
Behavior: Includes TLB + receive load balancing (requires ARP negotiation).
Switch requirement: None
Use case: Both transmit and receive load balancing
Now you can apply the config.
 1# verify config, it temporary apply but can rollback if problem exist.
 2# Sometimes it fail, prepare for the worst :)
 3$ netplan try
 4
 5$ netplan apply
 6$ cat /proc/net/bonding/bond0
 7
 8Ethernet Channel Bonding Driver: v6.8.0-90-generic
 9
10Bonding Mode: adaptive load balancing
11Primary Slave: None
12Currently Active Slave: eno1
13MII Status: up
14MII Polling Interval (ms): 100
15Up Delay (ms): 0
16Down Delay (ms): 0
17Peer Notification Delay (ms): 0
18
19Slave Interface: enp5s0
20MII Status: up
21Speed: 1000 Mbps
22Duplex: full
23Link Failure Count: 0
24Permanent HW addr: 00:30:64:5c:e2:4b
25Slave queue ID: 0
26
27Slave Interface: eno1
28MII Status: up
29Speed: 1000 Mbps
30Duplex: full
31Link Failure Count: 0
32Permanent HW addr: 00:30:64:5c:e2:4a
33Slave queue ID: 0
Routing
Some of this is already discussed earlier.
To view current route.
1ip route show # or just ip r
2default via 192.168.254.254 dev eth0
31.1.1.1 via 192.168.254.254 dev eth0
48.8.8.8 via 192.168.254.254 dev eth0
5127.0.0.0/8 via 127.0.0.1 dev lo
6192.168.154.0/24 dev virbr0 proto kernel scope link src 192.168.154.10 linkdown
7192.168.254.0/24 dev eth0 proto kernel scope link src 192.168.254.69
8192.168.254.254 dev eth0 scope link
Adding and Removing Routes
To route static IP.
1ip route add default via 192.168.254.254
2ip route del default via 192.168.254.254 dev eth0
To route whole subnet, used in VMs management.
1ip route add 192.168.254.0/24 via 192.168.254.254
Using Gateways and Metric
You can set up multiple gateways with different metrics, defining a priority order for failover:
1ip route add default via 192.168.10.1 dev eth0 metric 100
2ip route add default via 192.168.20.1 dev eth1 metric 200
Traffic Flow and Packet Control
With iptables it can handle firewall (there is a dedicated section for firewalls, ufw;firewalld), allowing control traffic at more enhanced security.
This guarantees you don’t cut off SSH access.
1iptables -I INPUT 1 -p tcp --dport 22 -j ACCEPT
View current iptables config
1iptables -L -v -n
2
3# list rules with numbers
4iptables -L INPUT --line-numbers -n -v
Setting basic firewall rules.
This will allow incomming traffic from 192.168.254.0/24 subnet and block all other incomming connection
1iptables -A INPUT -s 192.168.254.0/24 -j ACCEPT
2iptables -A INPUT -j DROP
Allow outgoing only to a specific subnet
1iptables -A OUTPUT -d 192.168.254.0/24 -j ACCEPT
2iptables -A OUTPUT -j DROP
Block all outgoing traffic
1iptables -A OUTPUT -j DROP
Without this, replies to allowed traffic will be dropped.
1iptables -A INPUT  -m conntrack --ctstate ESTABLISHED,RELATED -j ACCEPT
2iptables -A OUTPUT -m conntrack --ctstate ESTABLISHED,RELATED -j ACCEPT
Application routing; specific incomming/outgoing PORT.
 1# DNS
 2iptables -A OUTPUT -p udp --dport 53 -j ACCEPT
 3iptables -A OUTPUT -p tcp --dport 53 -j ACCEPT
 4
 5# UDP DNS (most queries)
 6iptables -A INPUT -p udp --dport 53 -j ACCEPT
 7
 8# TCP DNS (zone transfers, large responses, DNSSEC)
 9iptables -A INPUT -p tcp --dport 53 -j ACCEPT
10
11# Web
12iptables -A OUTPUT -p tcp --dport 80  -j ACCEPT
13iptables -A OUTPUT -p tcp --dport 443 -j ACCEPT
Deleting iptable rules
Delete by rule number
1$ iptables -L INPUT --line-numbers -n -v
2num  pkts bytes target  prot opt in  out source              destination
31    ACCEPT all  --  lo  *   0.0.0.0/0           0.0.0.0/0
42    ACCEPT udp  --  *   *   192.168.254.0/24    0.0.0.0/0 udp dpt:53
53    DROP   all  --  *   *   0.0.0.0/0           0.0.0.0/0
6
7$ iptables -D INPUT 2
Delete by exact rule match
1iptables -D OUTPUT -p udp --dport 53 -j ACCEPT
Reset completely - please don’t do this
1iptables -F
2iptables -X
3iptables -P INPUT ACCEPT
4iptables -P OUTPUT ACCEPT
5iptables -P FORWARD ACCEPT
Saving changes
1netfilter-persistent save
Other commands
 1# Flush old rules
 2iptables -F
 3iptables -X
 4
 5# Set iptable to default
 6iptables -P INPUT DROP
 7iptables -P OUTPUT DROP
 8iptables -P FORWARD DROP
 9
10# Allow loopback
11iptables -A INPUT  -i lo -j ACCEPT
12iptables -A OUTPUT -o lo -j ACCEPT
Firewall
To simplify iptables, we can use interface like firewalld (fedora base) or ufw (ubuntu base).
UFW - Uncomplicated Firewall
Make sure IPv6 is enabled, this will ensure that rules added include both IPv4 and IPv6.
/etc/default/ufw
1IPV6=yes
Default Config
This config will be enough for PC use.
1ufw default deny incoming
2ufw default allow outgoing
Allow SSH Connection
If you are configuring this in a ssh session make sure to set this first before applying config.
 1ufw allow ssh
 2
 3# or allow openssh
 4$ sudo ufw app list
 5Available applications:
 6  OpenSSH
 7
 8$ ufw allow OpenSSH
 9
10# allw ssh by port number
11$ufw allow 22
Optional, rate limit to protect form brute-force attack.
1ufw limit ssh
Enable UFW
UFW should now be configured to accept SSH connection. To verify rules that are added.
1ufw show added
After comforming you can enable the firewall with.
1ufw enable
Allowing Other Connections
Port range
1ufw allow 8000:8080/tcp
2ufw allow 8000:8080/udp
Specific IP Address
1ufw allow from 192.168.100.69
2ufw allow from 192.168.100.69 to any port 22
Subnets
1ufw allow from 192.168.100.0/24
2ufw allow from 192.168.100.0/24 to any port 22
To an interface
1ufw allow in on eth1 to any port 80
Denying Connections
Deny by service
1ufw deny ssh
Specific IP Address
1ufw deby from 192.168.100.69
2ufw deny from 192.168.100.69 to any port 22
Deleting Rules
To delete rules, we need to get the rule number.
 1$ufw status numbered
 2Status: active
 3
 4     To                         Action      From
 5     --                         ------      ----
 6[ 1] 22                         ALLOW IN    192.168.100.0/24
 7[ 2] 80                         ALLOW IN    Anywhere
 8
 9
10ufw delete 2
UFW Status and Rules
1ufw status verbose
To disable
1ufw disable
To reset
1ufw reset
Enable logging
1ufw reset
Firewalld
Firewalld is preinstalled on many Linux distributions, such as RHEL and its derivatives (fedora, centos).
Managing Firewalld
Start, stop, enable and disable service.
1sudo systemctl start firewalld
2sudo systemctl enable firewalld
3sudo systemctl stop firewalld
4sudo systemctl disable firewalld
To check firewalld state.
1firewall-cmd --state
To reload firewalld configuration.
1firewall-cmd --reload
Configuring Firewalld
Firewalld has two configuration set; Runtime and Permanent. Permanent configuration is retained even after reboot.
1# permanent
2firewall-cmd --zone=public --add-service=http --permanent
3
4# runtime
5firewall-cmd --zone=public --add-service=http
Zones
Different zones allow different network services and incoming traffic types while denying everything else. After enabling firewalld for the first time, Public will be the default zone.
To view default zone:
1$ firewall-cmd --get-default-zone
2public (default)
3  interfaces: eth0
 1$ firewall-cmd --zone=public --list-all
 2public (default, active)
 3  target: default
 4  ingress-priority: 0
 5  egress-priority: 0
 6  icmp-block-inversion: no
 7  interfaces: eth0
 8  sources:
 9  services: dhcpv6-client mdns ssh
10  ports:
11  protocols:
12  forward: yes
13  masquerade: no
14  forward-ports:
15  source-ports:
16  icmp-blocks:
17  rich rules:
Going line by line through the output:
-
public (default, active) indicates that the public zone is the default zone (interfaces default to it when they come up), and it is active because it has at least one interface or source associated with it.
-
interfaces: eno1 eno2 lists the interfaces associated with the zone.
-
sources: lists the sources for the zone. There aren’t any now, but if there were, they would be of the form xxx.xxx.xxx.xxx/xx.
-
services: dhcpv6-client ssh lists the services allowed through the firewall. You can get an exhaustive list of firewalld’s defined services by executing firewall-cmd –get-services.
-
ports: lists port destinations allowed through the firewall. This is useful if you need to allow a service that isn’t defined in firewalld.
-
masquerade: no indicates that IP masquerading is disabled for this zone. If enabled, this would allow IP forwarding, with your computer acting as a router.
-
forward-ports: lists ports that are forwarded.
-
icmp-blocks: a blacklist of blocked icmp traffic.
-
rich rules: advanced configurations, processed first in a zone.
-
default is the target of the zone, which determines the action taken on a packet that matches the zone yet isn’t explicitly handled by one of the above settings.
Now let’s create a simple multi-zoned firewall rule.
1firewall-cmd --permanent --zone=public --remove-service=ssh
2firewall-cmd --permanent --zone=public --add-service=http
3firewall-cmd --permanent --zone=internal --add-source=192.168.100.69
4firewall-cmd --reload
We basically removed public SSH access to server and only from IP 192.168.100.69 can access, and http that is accessible outside.
 1$ firewall-cmd --zone=public --list-all
 2public (default, active)
 3  target: default
 4  ingress-priority: 0
 5  egress-priority: 0
 6  icmp-block-inversion: no
 7  interfaces: eth0
 8  sources:
 9  services: dhcpv6-client http mdns
10  ports:
11  protocols:
12  forward: yes
13  masquerade: no
14  forward-ports:
15  source-ports:
16  icmp-blocks:
17  rich rules:
18
19$ firewall-cmd --zone=internal --list-all
20internal (active)
21  target: default
22  ingress-priority: 0
23  egress-priority: 0
24  icmp-block-inversion: no
25  interfaces:
26  sources: 192.168.100.69
27  services: dhcpv6-client mdns samba-client ssh
28  ports:
29  protocols:
30  forward: yes
31  masquerade: no
32  forward-ports:
33  source-ports:
34  icmp-blocks:
We can also add rule to fully drop an IP to access the server.
1firewall-cmd --permanent --zone=drop --add-source=192.168.254.169
2firewall-cmd --reload
Rich Rules
Rich rule is used when; services/ports aren’t specific enough, you need conditions (source IP, interface, protocol, family, logging, rate-limit, etc.) and you want iptables-style control without dropping to raw rules.
Deny IPv4 traffic over TCP from host 192.168.254.169 to port 22.
1firewall-cmd --zone=public --add-rich-rule 'rule family="ipv4" source address="192.168.254.169" port port=22 protocol=tcp reject'
Allow IPv4 traffic over TCP from host 192.0.2.0 to port 80, and forward it locally to port 6532.
1firewall-cmd --zone=public --add-rich-rule 'rule family=ipv4 source address=192.0.2.0 forward-port port=80 protocol=tcp to-port=6532'
Forward all IPv4 traffic on port 80 to port 8080 on host 198.168.254.169.
1firewall-cmd --zone=public --add-rich-rule 'rule family=ipv4 forward-port port=80 protocol=tcp to-port=8080 to-addr=198.168.254.169'
To show current rich rule in the public zone.
1firewall-cmd --zone=public --list-rich-rules
VLAN
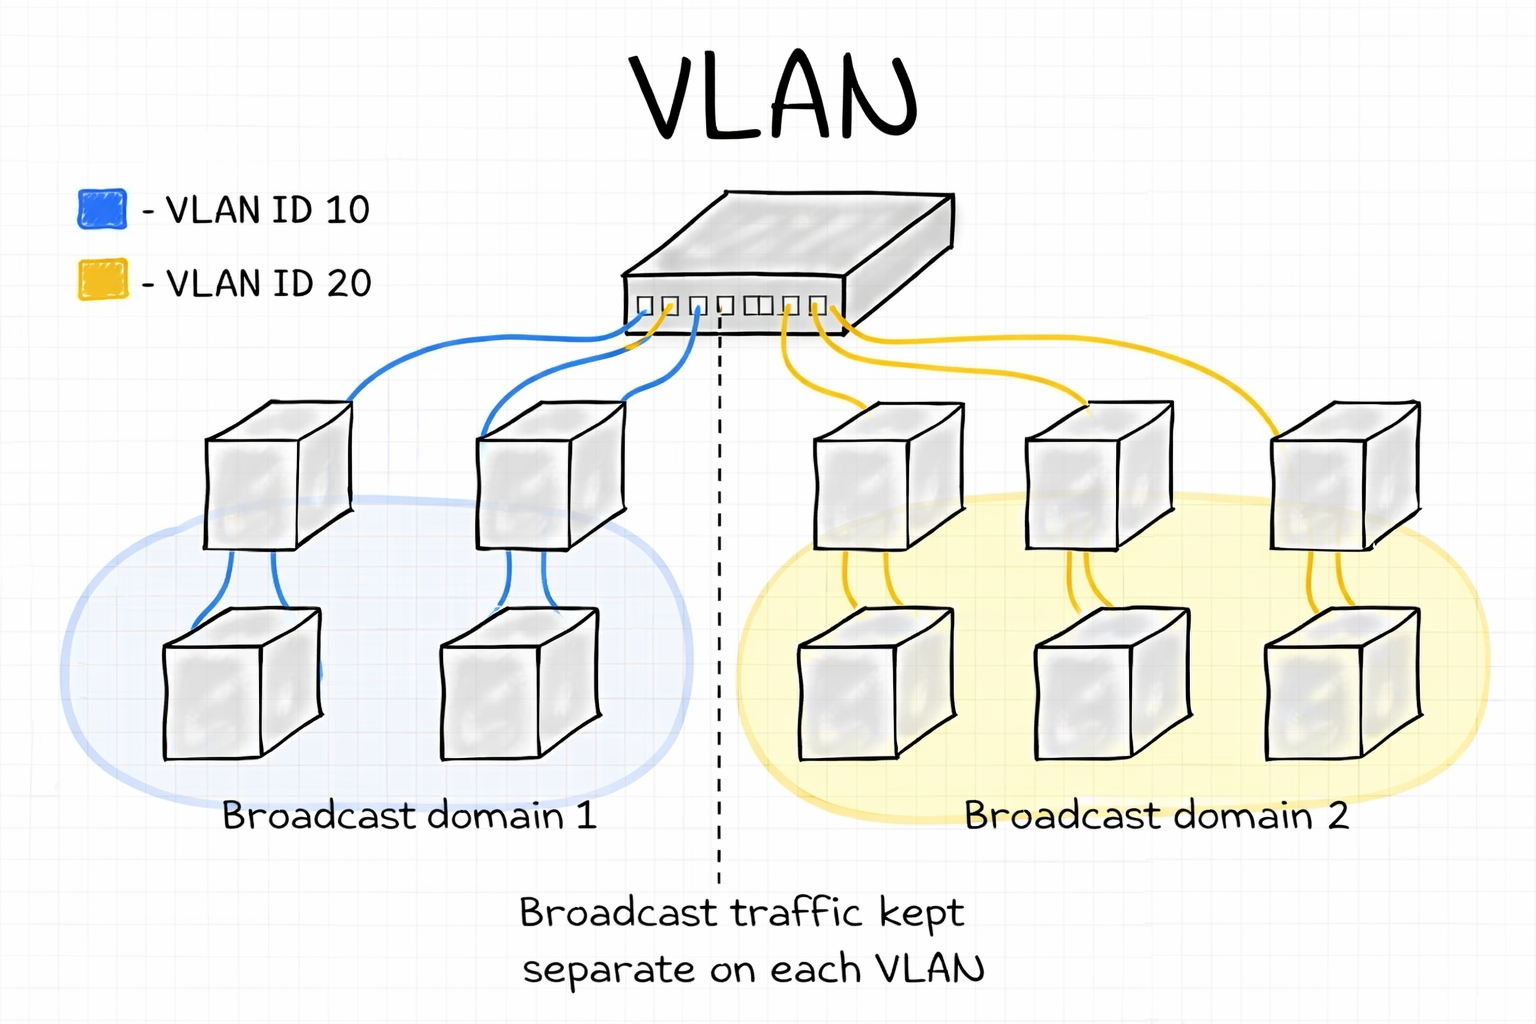
A VLAN (Virtual Local Area Network) is a way to split one physical network switch into multiple logical networks.
Even though devices are plugged into the same switch, a VLAN:
- Separates broadcast traffic
- Improves security
- Reduces unnecessary network noise
Each VLAN acts like its own broadcast domain. Devices in VLAN 10 can’t see broadcast traffic from VLAN 20 unless a router or Layer-3 switch connects them.
Enable VLAN
Verify if it is present in the kerner.
1lsmod | grep 8021q
If no output, enable using modprobe
1modprobe 8021q
To make if permanent on boot.
1echo "8021q" | sudo tee -a /etc/module
Install VLAN
1# debian base
2apt install vlan
3
4#centos base / this is depreciated
5dnf install vconfig
Create VLAN Interface
Using ip command.
1ip link add link eth0 name eth0.10 type vlan id 10
2ip link set dev eth0.10 up
3ip addr add 192.168.169.169/24 dev eth0.10
Using nmcli
 1nmcli connection add type vlan \
 2  con-name vlan10 \
 3  ifname eth0.10 \
 4  dev eth0 \
 5  id 10
 6
 7nmcli connection modify vlan10 \
 8  ipv4.method manual \
 9  ipv4.addresses 192.168.10.2/24
10
11nmcli connection modify vlan10 \
12  ipv4.gateway 192.168.10.1 \
13  ipv4.dns 8.8.8.8
14
15nmcli connection up vlan10
Using Netplan. /etc/netplan/01-vlan.yaml
 1network:
 2  version: 2
 3  renderer: networkd
 4
 5  ethernets:
 6    eth0:
 7      dhcp4: no
 8
 9  vlans:
10    eth0.10:
11      id: 10
12      link: eth0
13      addresses:
14        - 192.168.10.2/24
15      gateway4: 192.168.10.1
16      nameservers:
17        addresses: [8.8.8.8, 1.1.1.1]
1netplan apply
Using networkd. Create parent interface eth0.10 /etc/systemd/network/10-vlan10.netdev.
1[Match]
2Name=eth0
3
4[Network]
5VLAN=eth0.10
Configure IP on VLAN interface /etc/systemd/network/10-eth0.10.network.
1[Match]
2Name=eth0.10
3
4[Network]
5Address=192.168.10.2/24
6Gateway=192.168.10.1
7DNS=8.8.8.8
Restart network service.
1systemctl restart systemd-networkd